Showing posts with label excel. Show all posts

Tuesday, March 24, 2020

Excel displays formula rather than result

Sometimes a bug in Excel results in the application displaying the text of a formula rather than the result of the formula in the spreadsheet. I have not been able to find a pattern of when it does it, but I have some spreadsheets that do this consistently.

The Fix

To get Excel to properly display the result:
  • Select the cell.
  • Format the cell as "General". (Right-click the cell, select Format Cells, and choose "General.")
  • Delete the "=" at the beginning of your formula, and hit Enter.
  • Insert the "=" back in the formula at the beginning.
That is it. You should now see the result of the calculation in the cell rather than the text of the formula.

Correct negative dates or times in Excel

When Excel shows ##### because the cell has a negative date or time value, make sure that you:
  • Verify dates and times are positive values when you’re using the 1900 date system.
  • Use a formula to subtract dates or Add or subtract time correctly to avoid negative date or time value results.

### in Excel

 Possible Reason No. 1
If the cell width is too short, Excel either simply cuts the visible text off, or it flows into the next cell (depending if the next cell has some content in it or not).
Some cell formats (e.g. decimals) can be shortened if a cell is not wide enough to display the entire number. However, some formats (e.g. dates and times) require the cell to be wide enough to display the entire value. If the cell is not wide enough, it will display a row of hashes.

Solution

Excel Alter Column Width
This problem is easily solved, by altering the cell width. The easiest way to do this is to drag the bar separating the column headers (as shown in the image on the right), until the cell is wider.
Alternatively, if you double-click on this bar, the cell should automatically re-size to fit the contents.
  

Possible Reason No. 2

If Excel continues to display a string of # symbols, no matter how wide you make your column, it is likely that Excel is attempting to display the contents of the cell as a date or time, but the cell contains an invalid date or time value.
As dates and times are stored as positive numeric values within Excel, some values (for example negative values) are invalid as dates or times. Excel shows this by filling the cell with # symbols.

Solution

  1. If the cell is intended to contain a date or time, check your formulas. Excel dates and times must be positive numeric values. Note that Excel can not handle negative dates or times.
  2. If the cell is not intended to contain a date or time, change the formatting of the cell.
    The quickest way to change a cell's formatting is to select the cell to be formatted and then select the required cell formatting from the drop-down menu in the 'Number' group on the Home tab of the Excel ribbon (see below):
    Excel Format Cells Drop Down Menu on Ribbon
However! If you use this cell as a data-input to, for example, a field in a merged Word document, only the first 256 characters will be grabbed!!!

Friday, March 20, 2020

Email charts using Excel VBA

While I was doing my project, I got a request from the client, to include charts in the mails along with other content which is being shared earlier.

As we all are so much into google, so I did some research on how we can do this.

Following are some nice examples that really helped me.


For simple mail, we all do this

Option Explicit
Private Sub CommandButton1_Click()
    On Error GoTo ErrHandler
    
    ' SET Outlook APPLICATION OBJECT.
    Dim objOutlook As Object
    Set objOutlook = CreateObject("Outlook.Application")
    
    ' CREATE EMAIL OBJECT.
    Dim objEmail As Object
    Set objEmail = objOutlook.CreateItem(olMailItem)

    With objEmail
        .to = "abc@xyz.com"
        .Subject = "This is a test message"
        .Body = "Hi there"
        .Display     ' DISPLAY MESSAGE.
    End With
    
    ' CLEAR.
    Set objEmail = Nothing:    Set objOutlook = Nothing
        
ErrHandler:
End Sub


Now for including a chart following are the examples:

Example 1

This example sends a chart with the name "Chart 1" from "Sheet1" of the ActiveWorkbook. It will save My_Sales1.gif in the temp folder, send the mail and delete My_Sales1.gif after that.
Sub SaveSend_Embedded_Chart()

    Dim OutApp As Object
    Dim OutMail As Object
    Dim Fname As String

    Set OutApp = CreateObject("Outlook.Application")
    Set OutMail = OutApp.CreateItem(0)

    'File path/name of the gif file
    Fname = Environ$("temp") & "\My_Sales1.gif"

    'Save Chart named "Chart 1" as gif file
    'If you hold down the CTRL key when you select the chart
    'in 2000-2013 you see the name in the Name box(formula bar)
    ActiveWorkbook.Worksheets("Sheet1").ChartObjects("Chart 1").Chart.Export _
            Filename:=Fname, FilterName:="GIF"

    On Error Resume Next
    With OutMail
        .To = "abc@xyz.com"
        .CC = ""
        .BCC = ""
        .Subject = "This is the Subject line"
        .Body = "Hi there"
        .Attachments.Add Fname
        .Send   'or use .Display
    End With
    On Error GoTo 0

    'Delete the gif file
    Kill Fname

    Set OutMail = Nothing
    Set OutApp = Nothing
End Sub

Example 2

This example sends a chart sheet with the name "Chart1" from the ActiveWorkbook.
It will save My_Sales2.gif the temp folder, send the mail and delete My_Sales2.gif after that.
Sub SaveSend_Chart_Sheet()

    Dim OutApp As Object
    Dim OutMail As Object
    Dim Fname As String

    Set OutApp = CreateObject("Outlook.Application")
    Set OutMail = OutApp.CreateItem(0)

    'File path/name of the gif file
    Fname = Environ$("temp") & "\My_Sales2.gif"

    'Save Chart sheet named "Chart1" as gif file
    ActiveWorkbook.Sheets("Chart1").Export _
            Filename:=Fname, FilterName:="GIF"

    On Error Resume Next
    With OutMail
        .To = "abc@xyz.com"
        .CC = ""
        .BCC = ""
        .Subject = "This is the Subject line"
        .Body = "Hi there"
        .Attachments.Add Fname
        .Send   'or use .Display
    End With
    On Error GoTo 0

    'Delete the gif file
    Kill Fname

    Set OutMail = Nothing
    Set OutApp = Nothing
End Sub

Tuesday, April 9, 2019

How to Extract Pictures From An Excel File


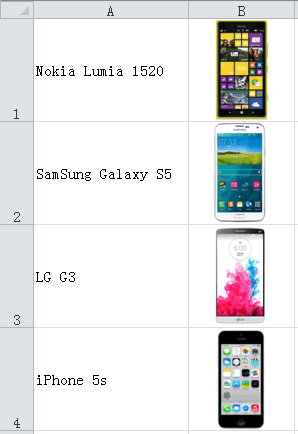
If you want to quickly extract pictures from an Excel file that embedded many pictures, you cannot be simply to do this. There's no build-in function to do this in Excel.

 Here are two simple ways to quickly extract pictures from an Excel file.
How to Quickly Extract Pictures From An Excel File


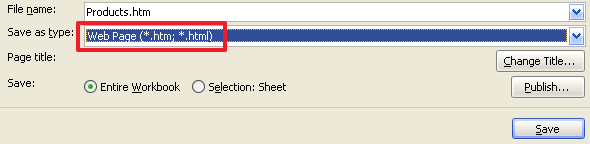
1.  Change the save as type to *.htm, *.html

Open your Excel file, click File tab, choose Save As, in the Save As window, click the drop-down menu labeled Save as type:, scroll down and choose Web Page (*.htm;*.html), Click Save.
Save as Web Page File
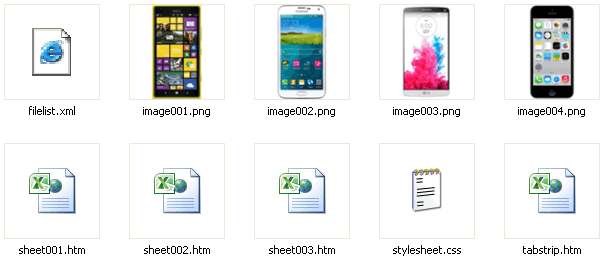
When a web page is saved in a computer two files are actually generated. One is the html file, and another is a folder that contains all the images and other component files that are a part of the web page. For example, an Excel file named Products.xls saved as a web page will generate Products.htm and a folder labeled Products_files. If Products.xlscontained images, these images will now be in the Products.xls_files folder. Now, open Products.xls_files folder, you will sell all the pictures.
All images in Web Page File


2. Change the Excel file extension (only available with .xlsx) as a RAR file 

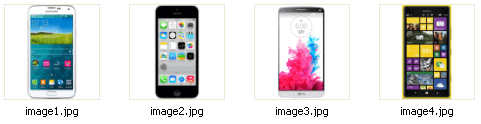
For example, change Products.xlsx to Products.rar, extract the Products.rar file, you will see 3 folders (_rels, docProps and xl) and 1 xml file ([Content_Types].xml), open xl folder, open media folder, you will sell all the images in the media folder.
All images in media folder

Monday, March 25, 2019

How To Extract Formulas From Excel At Once


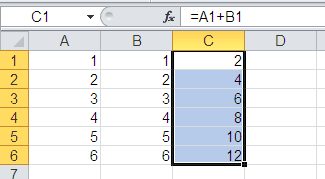
Sometimes you may need to convert formula to text string in Excel, such as =A1+B1, follow the below mentioned steps for extracting the formulas from Excel at once.

Example

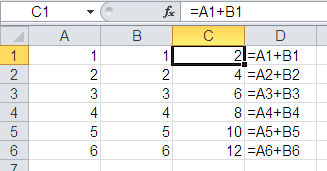
For Example, we need to show the Column C with original formulas but not their calculated results in Column D, see the following screen shot.
Extract Formuls Question

Steps

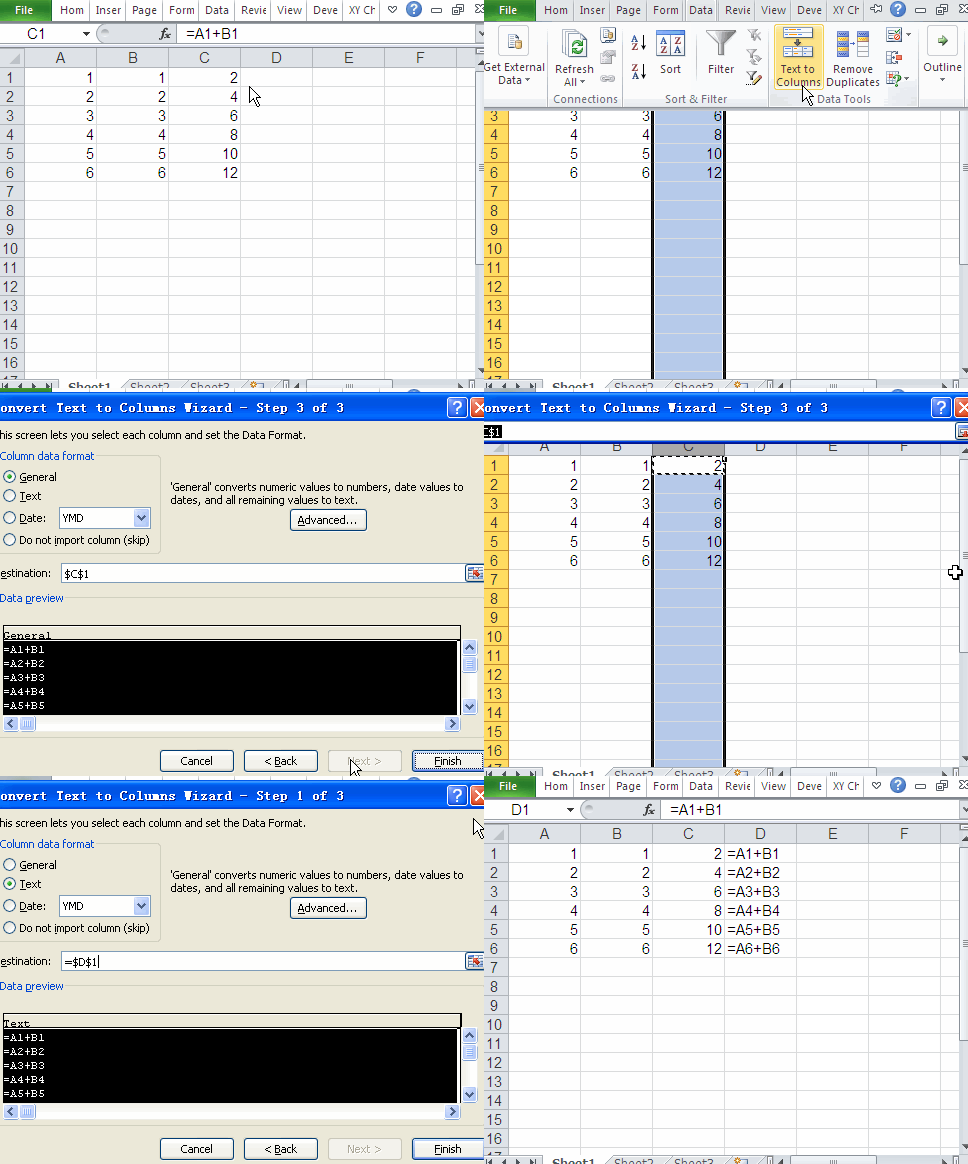
  1. select Column C.
  2. Under the Data menu tab, in the Data Tools group, click the Text to Columns button.
  3. In Convert Text to Columns Wizard window, do the following:
    1. In Convert Text to Columns Wizard - step 1 of 3 window, click Next.
    2. In Convert Text to Columns Wizard - step 2 of 3 window, click Next.
    3. In Convert Text to Columns Wizard - step 3 of 3 window, under Column data format, choose Text, in Destination box, enter a cell reference: D1, or click Collapse Button Collapse Button to temporarily hide the dialog box, select cell D1 on the worksheet, and then press Expand Button Expand Button.
    4. click Finish.

Final Results

Extract Formuls Results

Video

Extract Formuls From Excel

Monday, March 18, 2019

Quickly Copy Values Without Formulas in Excel

You can quickly copy values without formulas in Excel. 

The example may be easier to understand if you copy A1:C5 to a blank worksheet.


A B C
1 Data Formula Result
2 3 =A2-1
3 4 =A3-1
4 5 =A4-1
5 6 =A5-1


Step 1: Select B2
Step 2: Press and hold CTRL then Select B3:B5
Step 3: Press CTRL C
Step 4: Select a blank cell (eg. C2) and Press CTRL V to paste the values.


Excel VBA Editor Keyboard Shortcuts


The complete list of Excel VBA Editor (VBE) keyboard shortcuts are for U.S. keyboard layout and Windows Operation system. 
#ActionShortcut
1HelpF1
2Object BrowserF2
3FindF3
4Properies WindowF4
5RunF5
6Switch Split WindowsF6
7Goto Window Of ObjectF7
8StepF8
9BreakpointF9
10Activate Menu BarF10
11Toggle Insert ModeInsert
12DeleteDelete
13Beginning Of LineHome
14End Of LineEnd
15Page UpPgUp
16Page DownPgDn
17Left←
18Right→
19Up↑
20Down↓
21IndentTab
22New LineEnter
23Delete Prev CharBackSpace
24Procedure DefinitionShift F2
25Find PrevShift F3
26Find NextShift F4
27Procedure StepShift F8
28Quick WatchShift F9
29Show Right Click MenuShift F10
30PasteShift Insert
31Select To Start Of LineShift Home
32Select To End Of LineShift End
33Select To Top Of ModuleShift PgUp
34Select To End Of ModuleShift PgDn
35Extend Selection Left 1 CharShift ←
36Extend Selection Right 1 CharShift →
37Extend Selection UpShift ↑
38Extend Selection DownShift ↓
39Un-indentShift Tab
40Focus To Object BoxCtrl F2
41Close WindowCtrl F4
42Run To CursorCtrl F8
43Activate Menu BarCtrl F10
44Select All TextCtrl B
45CopyCtrl C
46Export ModuleCtrl E
47FindCtrl F
48Immediate WindowCtrl G
49ReplaceCtrl H
50Turn On Quick InfoCtrl I
51List MembersCtrl J
52Show Call StackCtrl L
53Import FileCtrl M
54New LineCtrl N
55PrintCtrl P
56Project WindowCtrl R
57SaveCtrl S
58Show Available ComponentsCtrl T
59PasteCtrl V
60CutCtrl X
61Cut Entire LineCtrl Y
62UndoCtrl Z
63CopyCtrl Insert
64Delete To End Of WordCtrl Delete
65Top Of ModuleCtrl Home
66End Of ModuleCtrl End
67Top Of Current ProcedureCtrl Page Up
68End Of Current ProcedureCtrl Page Down
69Left WordCtrl Left Arrow
70Right WordCtrl Right Arrow
71Previous ProcedureCtrl Up Arrow
72Next ProcedureCtrl Down Arrow
73Turn On Complete WordCtrl Space Bar
74Cycle WindowsCtrl Tab
75Delete To Start Of WordCtrl BackSpace
76Close VBEAlt F4
77Run Error HandlerAlt F5
78Switch Between Last 2 WindowsAlt F6
79Step Error HandlerAlt F7
80Return To ApplicationAlt F11
81Add-Ins MenuAlt A
82Debug MenuAlt D
83Edit MenuAlt E
84File MenuAlt F
85Help MenuAlt H
86Insert MenuAlt J
87Format MenuAlt O
88Close & ReturnAlt Q
89Run MenuAlt R
90Tools MenuAlt T
91View MenuAlt V
92Window MenuAlt W
93System MenuAlt Space Bar
94Cycle ApplicationsAlt Tab
95UndoAlt BackSpace
96Previous PositionCtrl Shift F2
97Clear All BreakpointsCtrl Shift F9
98Turn On Param InfoCtrl Shift I
99Turn On List PropertiesCtrl Shift J