Showing posts with label text. Show all posts

Tuesday, March 24, 2020

Excel displays formula rather than result

Sometimes a bug in Excel results in the application displaying the text of a formula rather than the result of the formula in the spreadsheet. I have not been able to find a pattern of when it does it, but I have some spreadsheets that do this consistently.

The Fix

To get Excel to properly display the result:
  • Select the cell.
  • Format the cell as "General". (Right-click the cell, select Format Cells, and choose "General.")
  • Delete the "=" at the beginning of your formula, and hit Enter.
  • Insert the "=" back in the formula at the beginning.
That is it. You should now see the result of the calculation in the cell rather than the text of the formula.

Monday, March 25, 2019

How To Extract Formulas From Excel At Once


Sometimes you may need to convert formula to text string in Excel, such as =A1+B1, follow the below mentioned steps for extracting the formulas from Excel at once.

Example

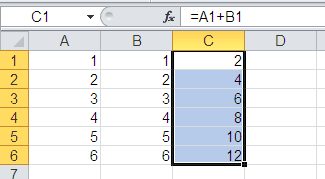
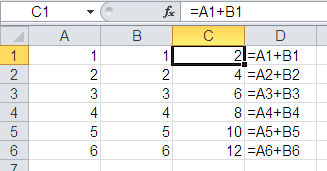
For Example, we need to show the Column C with original formulas but not their calculated results in Column D, see the following screen shot.
Extract Formuls Question

Steps

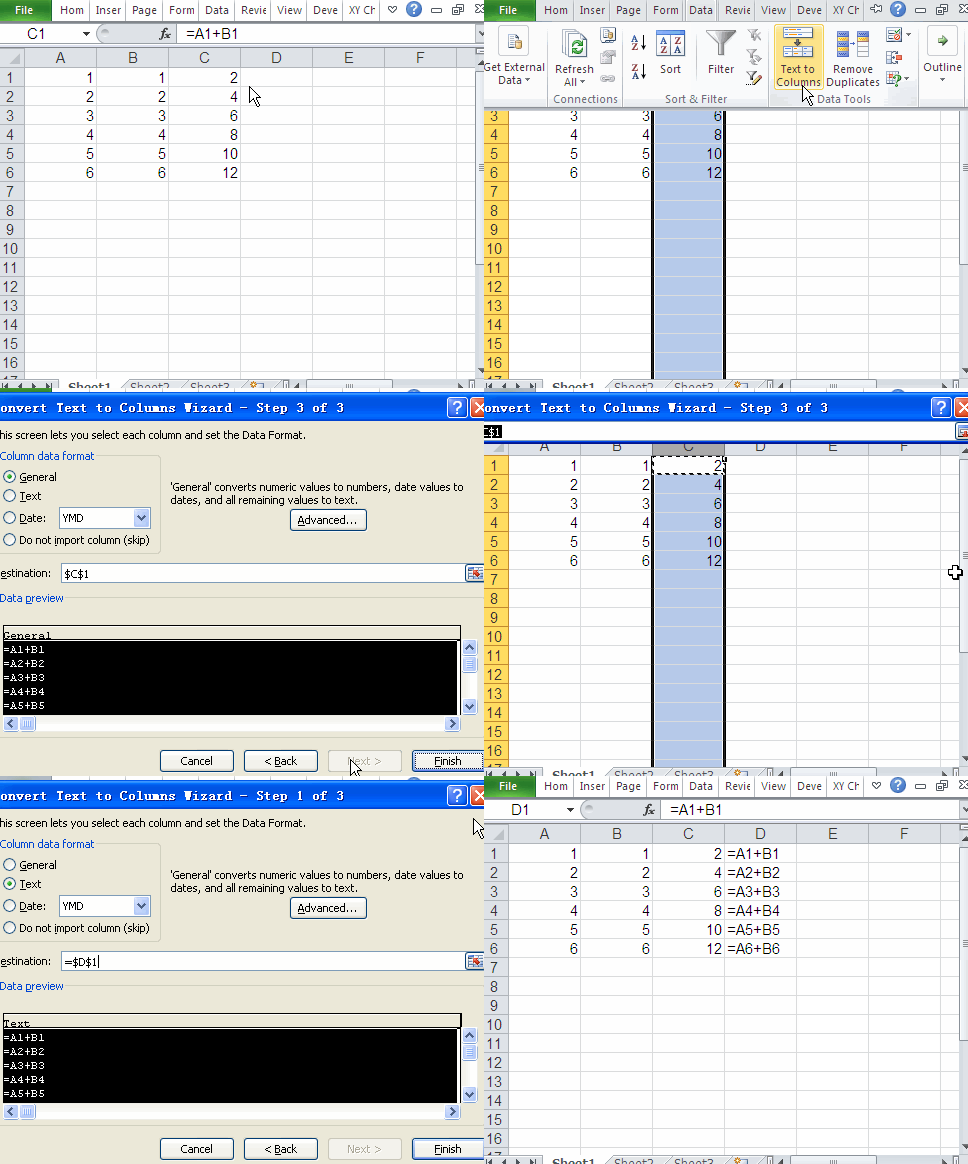
  1. select Column C.
  2. Under the Data menu tab, in the Data Tools group, click the Text to Columns button.
  3. In Convert Text to Columns Wizard window, do the following:
    1. In Convert Text to Columns Wizard - step 1 of 3 window, click Next.
    2. In Convert Text to Columns Wizard - step 2 of 3 window, click Next.
    3. In Convert Text to Columns Wizard - step 3 of 3 window, under Column data format, choose Text, in Destination box, enter a cell reference: D1, or click Collapse Button Collapse Button to temporarily hide the dialog box, select cell D1 on the worksheet, and then press Expand Button Expand Button.
    4. click Finish.

Final Results

Extract Formuls Results

Video

Extract Formuls From Excel

Thursday, February 28, 2019

Ways to copy content from a website with disabled text selection and right clicking


“… if it’s online, in one way or another it can be copied”
Below are some of the ways you can copy content from a website that has disabled text selection and/or right-clicking.

1. Disable JavaScript from the browser

As I mentioned in the beginning most website use JavaScript to disable text selection and right-clicking. Luckily browsers have a setting where you can either enable or disable JavaScript and in this case disable it, save and reload the page.
Once done copying don’t forget to activate javascript because some websites like facebook and other heavy rely on JS and disabling it will break these websites.

2. Copy from website source code
Websites are written in hypertext markup language (HTML). This code can be viewed by right clicking on the website if not disabled and selecting “View source”
For beginners, this will be confusing and overwhelming and you might require basic HTML skills.
However, if the website has disabled right click simply put below on your browser  followed by the website/page URL
  • view-source:http://www.xyzwebsite.com
Once you have access to the code you can easily get the information you want and copy paste as you desire.


3. Select from inspect element.

I will recommend this method for copying a small amount of text, it’s tedious. If the website is right click enabled but you can’t select the text simply right click on the text and choose “Inspect element” A small window will open with the web page source codes.
The only task will be to find the text within the codes mostly held by “<p></p>” code which you can comfortably copy. I know it’s confusing but check out below, to help you understand
I know it’s confusing but check out below, to help you understand

4. Using Proxy Sites

As opposed to disabling JavaScript from browser’s setting, some proxy website will give you an option to disables JavaScript before accessing a website.
There are many websites offering this service, search for “free proxy website” on your favorite search engine and begin to experiment.

5. Print website to PDF

In this case, you need to install print-to-PDF drivers such as PDFCreator. After installing the drivers you can easily print that web page to PDF which you can then copy the content you require.

6. Disable from CSS user-select property

CSS, i.e. Cascading Style Sheets, is what defines how the website looks likes i.e. the colors, fonts e.t.c This tool can also be used to disable text selection on a website using the property.user-select
Using inspect element window locate this property on the CSS. If you find it  ‘untick’ to disable it.

7. Take a screenshot of the content.

This is particularly useful with images where you can take a screenshot of the image/s from the restricted website and save it on your machine.
In addition using OCR. i.e “Optical Character Recognition” technology one can extract all visible text as editable text and copy the text.

Wednesday, September 2, 2015

Excel : Split text into different cells

You can take the text in one or more cells, and spread it out across multiple cells. This is the opposite of concatenate, where you can combine text from two or more cells into one cell. For example, if you have a column of full names, you can split that column into separate first name and last name columns, like this:
Before and after of text split into different columns
Go to Data > Text to Columns, and the wizard will walk you through the process. Here’s a full breakdown of how it works:
  1. Select the cell or column that contains the text you want to split.
    Note    Select as many rows as you want, but no more than one column. Make sure there’s enough empty columns to the right so nothing over there gets overwritten. If you don’t have enough empty columns, add them.
  2. Click Data >Text to Columns.
    Click the Data tab, and then click Text to Columns
  3. This starts the Convert Text to Columns Wizard. Click Delimited > Next.
  4. Check Space, and clear the rest of the boxes, or check Comma and Space if that is how your text is split (Smith, John, with a comma and space between the names). You can see a preview of your data in the Data preview window.
    Step 2 in the Convert Text to Columns Wizard
  5. Click Next.
  6. In this step, you pick the format for your new columns, or you can let Excel do it for you. If you want to pick your own format, select the format you want, such as Text, click the second column of data in the Data preview window, and click the same format again. Repeat for all the columns in the preview window.
    Step 3 in the Convert Text to Columns Wizard
  7. Click the Collapse Dialog Box button image button to the right of the Destination box to collapse the dialog box.
  8. Select the cells in your workbook where you want to paste your split data. For example, if you are dividing a full name into a first name column and a last name column, select the appropriate number of cells in two adjacent columns.
    Select the cells where you wnt to paste your split cells
  9. Click the Expand Dialog Box button image button to expand the dialog box, and then click Finish.
    Expand the dialog box when you're done selecting your cells.